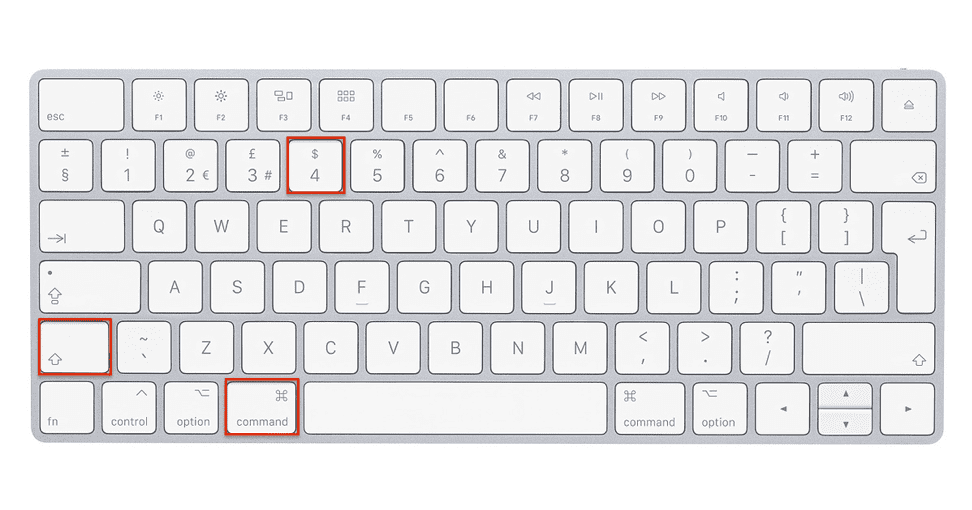
To take a screenshot on a Mac, press Shift + Command + 3 for a full screen capture. Use Shift + Command + 4 to capture a selected portion.
Capturing screenshots on a Mac is a straightforward process. Mac users often need to take screenshots for various purposes, such as sharing visual content, saving information, or troubleshooting. The Mac OS provides built-in shortcuts that make this task quick and easy.
Whether you need a full screen capture or just a selected portion, you can do it without the need for additional software. This guide will help you understand the basic steps to take screenshots efficiently on your Mac, ensuring you can capture exactly what you need with minimal effort.

Credit: www.wikihow.com
Basic Screenshot Methods
Taking screenshots on a Mac is simple and quick. You can capture your entire screen or just a selected portion. These methods will help you save important information or share visuals easily.
Entire Screen
To capture the entire screen, press Command (⌘) + Shift + 3. Your Mac will save the screenshot to your desktop. The file name will include the date and time. This method captures everything visible on your screen.
If you have multiple screens, this shortcut captures each screen separately. You will find multiple screenshots saved to your desktop.
Selected Portion
To capture a specific part of your screen, press Command (⌘) + Shift + 4. Your cursor will turn into a crosshair. Click and drag to select the area you want to capture. Release the mouse button to take the screenshot. Your Mac will save the image to your desktop.
This method is useful for capturing only what you need. It helps keep your screenshots clean and precise.
| Method | Shortcut |
|---|---|
| Entire Screen | Command (⌘) + Shift + 3 |
| Selected Portion | Command (⌘) + Shift + 4 |
Knowing these basic screenshot methods will help you capture and share information quickly. Master these shortcuts to improve your productivity on a Mac.

Credit: www.techsmith.com
Advanced Screenshot Techniques
Taking screenshots on a Mac is easy with advanced techniques. Whether capturing a specific window or the Touch Bar, these methods help. Let’s dive into these advanced screenshot techniques.
Specific Window
To capture a specific window, use this simple method:
- Press Command (⌘) + Shift + 4.
- Press the Spacebar. The cursor will change to a camera icon.
- Click the window you want to capture.
Your Mac will save the screenshot to your desktop. This method ensures only the selected window is captured.
Touch Bar
If your Mac has a Touch Bar, you can screenshot it too:
- Press Command (⌘) + Shift + 6.
The screenshot of your Touch Bar will appear on your desktop. This is useful for saving Touch Bar settings or sharing them.
| Action | Shortcut |
|---|---|
| Capture Specific Window | Command (⌘) + Shift + 4, then Spacebar |
| Capture Touch Bar | Command (⌘) + Shift + 6 |
These advanced techniques make screenshot tasks easy and efficient. Try them on your Mac today!
Keyboard Shortcuts
Learning how to take a screenshot on a Mac using keyboard shortcuts is essential. These shortcuts save time and make the process hassle-free. Let’s explore the different ways to capture your screen using simple keyboard shortcuts.
Capture Entire Screen
To capture the entire screen, press Command (⌘) + Shift + 3. This will save a screenshot of your whole screen. The image file will appear on your desktop. This method is quick and easy for full-screen captures.
Capture Selected Area
For capturing a selected area, use Command (⌘) + Shift + 4. This turns your cursor into a crosshair. Drag the crosshair to select the area you want to capture. Release the mouse to take the screenshot. The selected area screenshot will save on your desktop.
| Shortcut | Action |
|---|---|
| Command (⌘) + Shift + 3 | Capture entire screen |
| Command (⌘) + Shift + 4 | Capture selected area |
Using these simple keyboard shortcuts makes taking screenshots on a Mac easy and efficient. Try them out and see how simple it is to capture your screen.
Using The Screenshot App
Taking screenshots on a Mac has never been easier with the Screenshot App. This built-in tool allows users to capture their screen in various ways. You can take full screenshots, window captures, and specific area grabs.
Opening The App
To begin, you need to open the Screenshot App. You can do this by pressing Shift + Command + 5 on your keyboard. This will bring up the Screenshot toolbar at the bottom of your screen.
The toolbar provides several options for capturing your screen. You can choose from capturing the entire screen, a selected window, or a specific portion of your screen.
Using Different Modes
The Screenshot App offers different modes for taking screenshots. Here are the modes you can use:
- Capture Entire Screen: Click the leftmost button on the toolbar. This will capture everything visible on your screen.
- Capture Selected Window: Click the second button from the left. Then, click on the window you want to capture.
- Capture Selected Portion: Click the third button from the left. Drag to select the area you want to capture.
Each mode has its own use case. Choose the one that fits your needs best.
| Shortcut | Action |
|---|---|
| Shift + Command + 3 | Capture entire screen |
| Shift + Command + 4 | Capture selected portion |
| Shift + Command + 5 | Open Screenshot toolbar |
Using these shortcuts can save you time. They allow quick access to screenshot options without opening the Screenshot App.
Start using these features to streamline your workflow and capture your screen efficiently.
Saving And Managing Screenshots
Learning how to take screenshots on a Mac is essential. But knowing how to save and manage these screenshots is equally important. Properly saving and organizing screenshots can save time and increase productivity.
Default Save Locations
By default, Mac saves screenshots directly to the desktop. This makes it easy to find your most recent captures. However, the desktop can quickly become cluttered with too many screenshots.
You can identify your screenshots by their default name. The names usually follow this format: “Screen Shot [Date] at [Time].png”. This helps in keeping track of when you took the screenshot.
Changing Save Locations
To prevent a messy desktop, you can change the default save location. Follow these steps to change the save location:
- Press Command + Shift + 5 to open the screenshot toolbar.
- Click on the Options button.
- Select a new location under the “Save to” section. You can choose from predefined locations or select “Other Location” to specify a custom folder.
Changing the save location helps in keeping your desktop clean and organized.
For more advanced users, you can use Terminal commands to change the default save location:
defaults write com.apple.screencapture location /path/to/your/folder
killall SystemUIServer
Replace /path/to/your/folder with the actual path to your desired folder. This command will change the default location for all future screenshots.
Organizing your screenshots effectively can improve your workflow. You can create folders for different projects or purposes. This makes it easier to find specific screenshots when needed.

Credit: www.youtube.com
Editing Screenshots
After taking a screenshot on your Mac, you may need to edit it. Editing screenshots is essential for clarity and emphasis. In this section, we will explore how to annotate and crop your screenshots.
Annotating
Annotating your screenshots can help highlight important information. Use the Markup tool to add text, shapes, and drawings. Follow these steps:
- Open the screenshot with Preview.
- Click the Markup toolbar button.
- Select the Text tool to add captions.
- Choose the Shape tool for arrows and circles.
- Use the Draw tool to freehand annotations.
These tools make your screenshots more informative and engaging.
Cropping
Cropping removes unnecessary parts of your screenshot. This makes the image more focused. Follow these steps to crop:
- Open the screenshot in Preview.
- Click the Show Markup Toolbar button.
- Use the Rectangular Selection tool to select the area you want.
- Click Tools in the menu bar.
- Select Crop from the dropdown menu.
By cropping, you keep only the relevant parts of your image. This enhances the visual appeal and clarity of your screenshots.
Troubleshooting
Taking a screenshot on a Mac is usually simple. But sometimes, you may face problems. This troubleshooting section will help you fix common issues. Follow these tips and tricks to take screenshots easily.
Common Issues
Here are some common problems you might face:
- Screenshot not saving: Sometimes, screenshots do not save to the desktop.
- Shortcut keys not working: The keyboard shortcuts may not respond.
- Partial screenshots: Only part of the screen is captured.
Tips And Tricks
Use these tips and tricks to solve screenshot problems:
- Check keyboard shortcuts: Ensure you use the right keys. Press Command + Shift + 3 for a full screen.
- Save location: Check where your screenshots are saved. Go to System Preferences > Keyboard > Shortcuts > Screenshots.
- Restart your Mac: Sometimes, a simple restart can fix many issues.
- Update your software: Ensure your Mac has the latest updates. Go to Apple menu > System Preferences > Software Update.
If these tips do not help, you might need a deeper solution. You can reset the PRAM or SMC. This can fix many hardware-related issues.
Common Issues Table
| Issue | Possible Solution |
|---|---|
| Screenshot not saving | Check save location and permissions |
| Shortcut keys not working | Verify shortcut settings in System Preferences |
| Partial screenshots | Ensure you are selecting the correct screen area |
Conclusion
Mastering screenshots on a Mac is simple and efficient. With these steps, you can capture anything on your screen. Remember to use shortcuts for quicker access. Practice regularly to become proficient. Now, you’re ready to take screenshots effortlessly. Enjoy the convenience and versatility of your Mac.
